
Blogging made easy with Picasa!
Okay so heres the fat and skinny on blogging.
COMMENTING ON A PHOTO
It's easy to post a comment to any picture that you see. At this time you can post a comment with or without a blogger user name or password. Just click on the word "comments" found just below any of the pictures you see posted on the page. Add your comments and fill in the security word (this is to verify you are not a computer) and click "publish". That's all there is to posting a comment to a picture.
UPLOADING A PICTURE
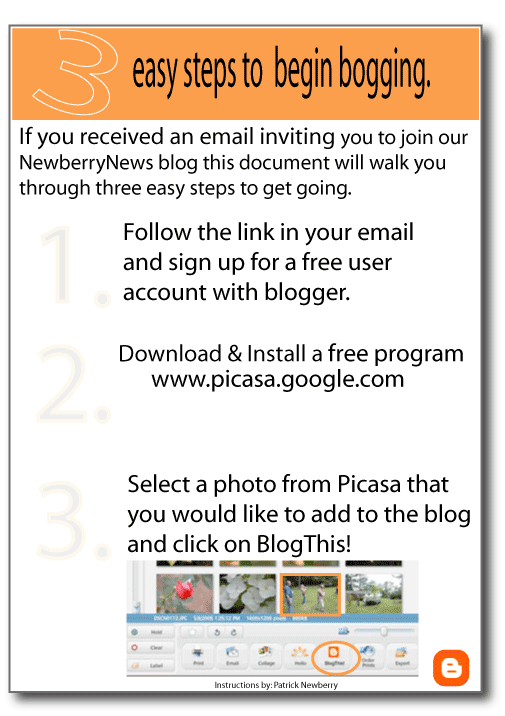
To follow along with the instructions below you will first need to download and install a free program: PICASA (Click Here for free download)
Using "BlogThis! you can post a picture to your blog directly from within Picasa. Since the "BlogThis!" button is integrated directly with Blogger's website, you will need a Blogger username and password to access the "BlogThis!" service.
To get a Blogger account, go to HTTP://www.blogger.com/start (IF YOU FOLLOWED THE LINK SENT TO YOU VIA EMAIL YOU SHOULD ALREADY HAVE SET UP YOUR BLOGGER USER NAME AND PASSWORD IF NOT DO THIS NOW).
How do I use "BlogThis!" to post a picture to my blog?
To publish a photo from Picasa to your blog using "BlogThis!", do the
following:
1. Select the photo in Picasa you wish to add to your blog in Picasa. You can publish up to one image at a time in a single blog post. (If you select more than one photo, only the first will be sent to Blogger.)
2. Click the "BlogThis!" button.
3. Enter your Blogger.com username and password. Check the "Remember me" box if you want to save your login information (this will set a cookie in your default browser).
4. Click the "Sign In" button.
5. If you are a first time user, select the blog you wish to publish to
using the drop down. You can also select a picture layout and image size. Click the "Save Settings" button.
6. A Blogger editor page will open displaying your pictures on an HTML page.
7. If you wish to include captions with your photos, click the "Edit HTML" tab and enter your caption text under each photo.
8. Click the "Publish" button. Your blog will open with your photos added at the top.
UPLOADING FROM PICASA WITH COMMENTS ADDED TO YOUR PHOTO
Captions entered in Picasa are not transferred to your blog when using the "BlogThis!" button. Follow these steps to add captions to the photos after they have been transferred to the "BlogThis!" editor:
1. In the “BlogThis editor, click the “Compose” tab. (Usually this is selected by default)
2. Click on the area where you would like to add text, a cursor will appear.
3. Type your caption. Use the buttons at the top of the editor for more formatting and alignment options. For HTML editing, click the “Edit HTML” tab.
4. When you’re finished, click the “Publish” button. Your blog will open with your photo and caption posted at the top of the page.
If you need additional help send me an email here. Patrick
posted by USRIFT | 12:42 PM
![]()
0 Comments:
Post a Comment
<< Home